Showing posts with label Swift. Show all posts

Friday, April 22, 2022

Guide to manage secrets in SwiftUI app

You are developing the app and a time comes when you need to integrate with other systems like Auth0, Firebase, or some other system that you need for your app. 

Tip: Never put the secrets in the code and check in to the repository. 

I have found that keeping the secrets separate from the code is the best way possible. So how do we do it? 

Step 1 - Create a Configuration file

Create a configuration file that will keep the secret variables and the values for your app. e.g. you are integrating RevenueCat in your application to manage the subscription. RevenueCat requires you to create an API key for the purchases and use that in your app. 

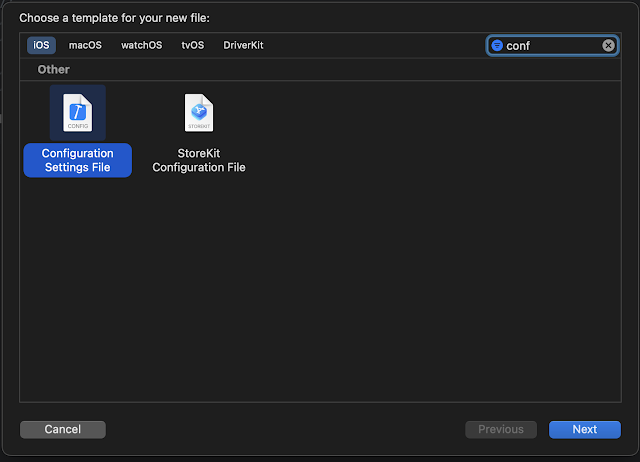
Select New File and search for Configuration Settings File. Select the template and name the file and create it. 


New configuration file


Once the file is created you can add the secret api key in the file. The format you want to follow is <variable name> = <value> e.g. let's name the variable PURCHASES_API_KEY then the value entry in the file will be 

PURCHASES_API_KEY = thisIs_yoursecretapikeyforpurchases

Step - 2 Add an entry to info.plist file

Now add a String entry to your info.plist file and reference the variable in the entry as shown below


Info.plist file entry

Step - 3 Access the value in swift

Each source code follows some kind of pattern or something for generic code. Like accessing something from the Bundle, I am posting a sample code that you can use to access the variable but check your source code for any pattern that might be followed for this kind of code, or do what you feel like a good code for you. 

var purchaseKey = ""

    if let key = Bundle.main.infoDictionary?["PURCHASES_API_KEY"] as? String {

      purchaseKey = key

    }

    else {

      purchaseKey = ""

    }


Step - 4 Where to keep the secrets

If you are building an enterprise app there will be a CI/CD pipeline and you would save the secrets in the vault provided by the Tooling. e.g. AzureDev Ops or Bitrise etc. 

What if you are an Indie dev and you just build the app just on your laptop and just deploy it directly to AppStore connect? Well, you can use some browser-based Password managers and put your secrets there. 

Alternatively, you can just create a secure Note by locking the Note. 


The choice is completely yours how you want to keep your secrets secrets but never keep them in your source code :)

The same applies to your GoogleServices json file, do not check in the file with your source code. Keep it separate. 

Tip: Add these secret files to the gitignore file of your repo so that you never accidentally check in them.

Now, what if you have check-in a secret to your git repo and it is in the history now? Well, subscribe and stay updated with the next post where we talk about how to keep an eye on your secrets in your code and what can you do if you check them in accedently. 

Happy coding!!
Thursday, March 24, 2022

Every iOS developer should know these Xcode tricks

 As iOS Developer you must be spending 8-9 hours of the day using Xcode. It is really important that you know the IDE to get most out of it and get more efficient with coding.

Refresh Canvas and close/open canvas


While using SwiftUI one of things you interact most is SwiftUI previewer and we see the Resume button on the previewer and have to click it to so many times. 


Well there is a keyboard shortcut that can make your life easier. By default it is set to Option + Command + P but you can reconfigure it your liking. e.g. I have set it to Command + P


and to do this I had to remove the shortcut for Print. Let's be very clear we do not do Print command from Xcode every day :), So I choose the nearest key to the default one.

Another good shortcut to know if Opening and closing the Canvas, May be there are times where you want to just focus on code and get some more real estate to work with and just want to close the canvas and then once done you want to reopen it again. You can use Option + Command + return to toggle the canvas visibility. Again you can use Xcode keybinding to reconfigure it to your liking.

Open Quickly

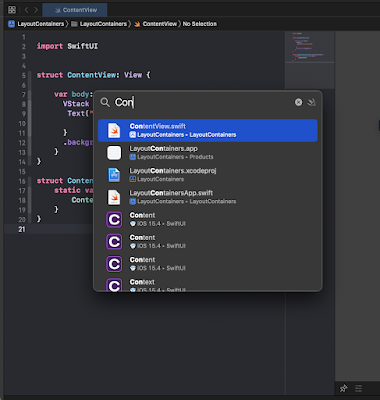
If you are working on large project and working on few files then you must know this feature of Xcode. Open quickly let's you open files with you know the name of the file. Press Command + Shift + O to open it and then just start trying the name and you will see the list


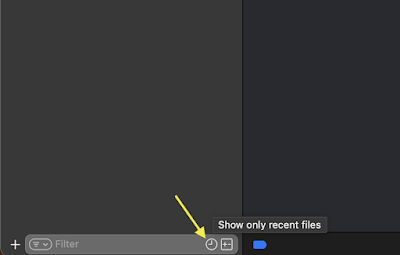
A companion option to this one is show only recent files toggle in the project navigator. When enabled it will only show the files you have recently interact with. 


Rename refactoring

Tuesday, March 22, 2022

Guide to SwiftUI layout and presentation controls in iOS

SwiftUI Layout Containers


It is always better to know about all the tools before you start your DIY project. You need to know what tools are available and what each tool can be used for. The same strategy can be applied to UI design. If you know all the available tools provided by the SwiftUI framework then you will be able to apply that knowledge to the beautiful designs that your designer has provided you with. Following are the Layout containers provided by SwiftUI.

HStack

you can refer HStack as a horizontal stack. You want to stack your controls shown in the image below. 

Horizontal plates stacking


The views in SwiftUI are aligned in a similar fashion as shown in image below

SwiftUI HStack


LazyHStack

As the name says this is a Lazy container. As the keyword, Lazy in a programming language is a strategy to delay the initialization until it is needed. The views in the LazyStack are not initialized until they are needed. 

You can try this code and see how it works. 

import SwiftUI


struct CustomText: View {

  private let index: Int

  init(index: Int) {

    print("init CustomText \(index)")

    self.index = index

  }

  var body: some View {

    Text("This is custom text view")

  }

}


struct ContentView: View {

    var body: some View {

      ScrollView(.horizontal) {

        LazyHStack {

          ForEach(0...100, id:\.self) { index in

            CustomText(index: index)

          }

        }

      }

    }

}

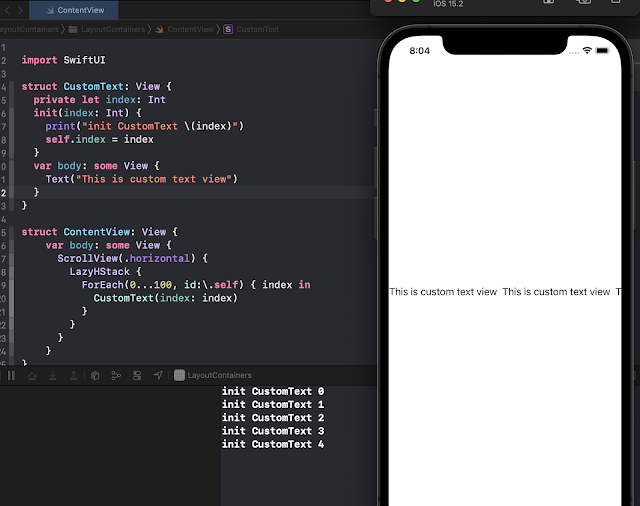
It should look like as shown in image below when you first run it. 

LazyHStack Image


VStack

The Stack is referred to as vertical stack e.g. as shown in the image below


Vertical Stack plates


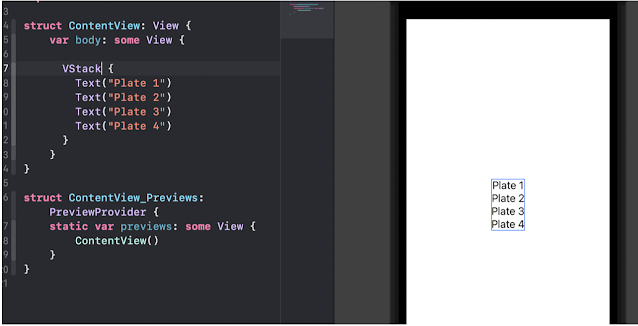
The corresponding SwiftUI views are stacked in a similar fashion as shown in the image below.

SwiftUI VStack


LazyVStack

LazyVStack works very similar to LazyHStack, it's just that it will align the items vertically. Before you read further, I want you to try the code from the LazyHStack section and just change the LazyHStack to LazyVStack. 

Check the output in the debug window. Must be wondering what is going on there. All the items are getting rendered. 

So what should you do it fix it? Try it before looking at the code below. 

|

|

|

I am sure you have tried it. The thing is that you need to change the ScrollView to be .vertical.

import SwiftUI


struct CustomText: View {

  private let index: Int

  init(index: Int) {

    print("init CustomText \(index)")

    self.index = index

  }

  var body: some View {

    Text("This is custom text view")

  }

}


struct ContentView: View {

    var body: some View {

      ScrollView(.vertical) {

        LazyVStack(alignment: .center, spacing: 50) {

          ForEach(0...100, id:\.self) { index in

            CustomText(index: index)

          }

        }

      }

    }

}

Sunday, May 24, 2020

Todo app using SwiftUI

It's time again and I started learning the iOS programming again as SwiftUI looks cool.

I spent couple of weeks going through the swift programming documentation and watched the WWDC videos. 

Note: This is an ongoing blog, which I update as I add more features to my TodoApp.

Learning


Follow along the Swift documentation. Try to code along the examples. Just go through the documentation even if you don't understand the whole thing just try to read all the documentation and get yourself aware with the concepts. This is will help later while reading the code of some
open source project. 

And.. read the documentation again. This is what I am doing now, this time try to understand and repeat until it becomes muscle memory. this is ongoing process.

SwiftUI


Follow the SwiftUI tutorials and try to recreate them. 

Videos


One of my colleague suggested WWDC videos and watch them in the order. 


Blogs

After going through all those videos and tutorials, I have decided to start creating something. So what is first app everyone build, it's Todo app. 

iOS-TodosApp


Download the Github repo to follow along and try the completed features.

Features


  • Create a new Todo
  • Context menu to Complete or Delete a Todo
  • Show completed tasks
  • Add Priority
  • Add Date

Upcoming


  • Edit 
  • Persist the data
  • Add Notification
  • Add Location
  • Login functionality

Learnings while doing TodoApp

Thursday, August 13, 2015

WKWebView for Hybrid Apps in iOS 8

With the release of iOS 8, Apple has brought so many changes in the Framework existing classes and have introduced new classes.

For Hybrid App development we introduced UIWebView, Which is used for displaying the Web content. 

However, with the release of iOS Apple has introduced a new class called WKWebView. which is derived from UIView here is the inheritance chain for WKWebView.

NSObject
|
UIResponder
|
UIView
|
WKWebView

WKWebView is also derived from UIView similar to UIWebView, So what are the difference in both.


Performance


Tuesday, August 5, 2014

Swift – All you need to know – Part 1

As we are studying the Swift programming language for past couple of months. While studying the language I cam across many features of the programming. So I thought to compile all those features with some brief introduction so that if some one just want to have a sneak peak at the features he/she can just go though this blog.

So this is the part -1 of the series I am thinking to write. Hope to complete it soon and cover the features in its entirety.


Objective C has been the core programming language for Apple software Development. It has been there for 20 years and serving us well. As per Apple they have worked for 4 years to design Swift Programming Language.

So what is it that they wanted to achieve with Swift? As per Apple during the Swift Programming language intro in WWDC 2014 they want “Objective C without the baggage of C”.

Swift is Fast, Safe, Modern and Interactive programming language. Here are the few key points of Swift programming language:

       Adapts safe programming patterns by using the Type Inference and Generics.

       It adopts the readability of Objective-C’s named parameters and the power of Objective-C’s dynamic Object Model.

       Provides seamless access to the existing Cocoa Framework and Objective-c code.

        Develop apps for iOS and Mac OS both.

You might have heard about the playgrounds the new feature in XCode 6 where you can use Swift language and see the output of the programming as you finish typing the code. We can discuss Playground and its features in other blog. Today we will talk about what all features Swift Programming language has come up with and will have brief introduction about each feature for you to kick start the language.


Wednesday, June 25, 2014

Optionals in Swift Programming Language

As we learned in my other blog about Initializers in Swift Programming Language that every variable in Swift should be initiazed before trying to access the value.

So what if you do not want to initialize a variable. That is where Optionals in Swift comes into play.

Before start discussing about Optionals you should know about nil. nil in Swift means nothing, no value at all.

Lets see what optionals provides us:

  • Optionals can store value nil which means no value.
  • Any non optional can not store nil.
  • you can check for options have nil or value by just writing if value no need to add extra code for == nil. because optionals can be used in boolean context.
Reading a value from the Optional is called unwrapping the Optional.


How to unwrap optionals?
  • using the force unwrap operator !.  but if you use this operator without checking for nil you may end up with an error at runtime.
  • using the if let statement you can check for the value and unwrap it once. This is called optional binding.

Optional Binding


Saturday, June 21, 2014

Initializers in Swift Programming Language

As the name says Initialization. Initializers are declared to set the initial values of the type when any object of type gets initialized. Initializers are declared using the the syntax

init() {…}

you can also pass parameters to the initializers. So As the Swift programming enforces one simple rule

“Every value must be initialized before it is used”

Only exception to the above rule is optionals where we default their vale to nil. 

So what the above rule means? Does it mean that I cannot write something like

var someString : String

No, It means before you access any value it must be initialized in every possible branch of the execution of the code. If you don’t do it you will get a compile time error. Initializers have the responsibility to fully initialize an instance.

Initializers in Structure

So if you have a structure like this

struct Person
{
    var firstName : String
    var LastName: String
    init(first: String, last: String)
    {
        firstName = first
        lastName = last
    }
}
  • Say you forgot to initialize the firstName in the initiazer, than compiler will generate a compile time error.
  • Also if you try to call any method before initializing all the variables in the struct, you will get a compile time error.
  • you can write initializers for Structures and Classes both.


Memberwise Initializer

What if you do not specify any Initializer to the struct or class? 

Swift Compiler provide you with a Memberwise initializer. So for the above structure if you do not have the initializer declared you can still initialize the values by saying

Saturday, June 7, 2014

Swift programming Tutorials - Functions and Closures

This is the part 1 of the series of the Tutorials of Swift programming. You can take a quick look at the Introduction to Swift.

In this Tutorials we will learn about

Functions

Use func to declare a function. Call a function by following its name with a list of arguments in parentheses. Use -> to separate the parameter names and types from the function’s return type.


Few Points of Functions:
  • Functions can return multiple values using Tuples
  • Functions can accept variable number of parameters and collect them into an array.
  • Nested functions
  • Functions can accept other functions as parameters.
  • Functions can have function as its return value. Because functions are first-class type.
  • Functions are special cases of closures

Thursday, June 5, 2014

Swift programming language Introduction

I was on my way to learn the all mighty Objective-C, and suddenly Apple has come up with the super cool programming language "Swift"....

We will discuss few things about Swift and you will see more Tutorials coming on the way here regarding this.

Here are few of the highlights of the Swift.

  • Adapts Safe Programming Patterns
  • Future of the Apple Software Development
  • Provides access to the existing Foundation and Cocoa Framework.
  • Support both iOS and Mac Apps development.
Best thing that comes with Swift is...

Playground

Playground is an innovative feature that lets you play with the programming language and you can see the results of the program on the fly without even building and running the code. What it does: