The first day with Xamarin I able to create a new Xamarin app and integrated google maps and able to run it in the simulator.
If you read the previous post. I did make it work on the simulator using the Plugin.Permissions. However, when I ran the application in the simulator it did work but I did not see any messages requesting for access permissions.
So, I am going to try to run the app on the device and see what happens.
The device I am going to use is Moto X running Android version 6.0.1. I am not gonna bore you with how to setup the device as you may not be going to use the same device. Just the basic stuff you need
Alright, I have the device up and running. Once you finish setup your device you will see it in visual studio. Make sure you have *.Android as a start-up project.

Weird! I did not see the permission request message on the device as well. Let's see what is happening.
Cool! Android has divided the permissions into 2 groups normal and dangerous. Normal permission will be granted automatically during the installation of the app. I would suggest reading through Android Permissions doc. Phew! finally, know why it is not asking for permissions.
Now that I know how permissions are granted, let's see what happens if I deny those permissions in the settings for my app.
The application is not starting. hmmmm.. let's see what is happening. So I figured that my app needs to implement the code as suggested in the post of Android permissions.
I will remove the plugin.permission that I installed yesterday and do it the way it is suggested in the post. Later will try to understand the benefits of that plugin and why I need it.
So I followed the post and it worked fine. but I went to the apps settings and denied the permission for the app for location. When I am launching my app again it is not requesting for the permission as it should be. So now I will have to dig deep into this.
I could not figure out why it is saying that permission is granted when clearly I had denied the location permission in apps settings.
Let me go back to the Plugin.Permissions and see what happens. Using the plugin it works fine and will show the dialog for location access request as shown in the image below.
I am not sure why it is not working with Xamarin support compact APIs. Sometimes you need to let it go... but I will come back to this.
Ok, so now that we have something that is ready to be consumed by our next step. If you read the First-day article Step 2 is to get the selected location on the map.
Before doing that I would like to setup a CI/CD for this app. Because that is what I would like my readers to follow. Have something small working condition and then before going deep into what you are doing setup a CI/CD.
I am planning to use Azure DevOps to use build the code whenever we merge the code to master. It is super easy to setup and I will add the steps here.
You log in to your Azure DevOps and create a new project. Once the project is created click on Pipelines on the left sidebar menu

Choose Github as I am using Github. It will ask you to authenticate against Github OAuth.
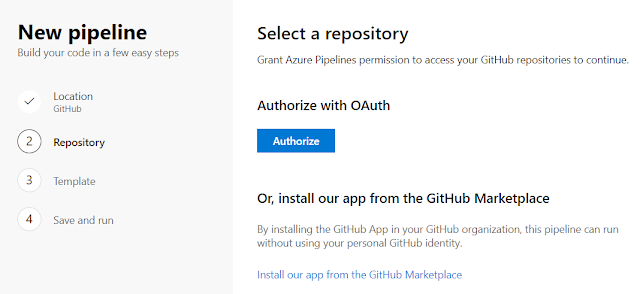
Once you finish authorization it will display the list of repository for you and choose the repo you want to setup CI for.
After that, it will try to find a recommended template for a build for you. It will show .Net Desktop but if you scroll down you will see Xamarin. Android and other options. You need to add build pipeline for each environment you want to build for.
I used the Xamarin.Android and created a build pipeline for that. It will save a yml file for this build in the branch you had selected, in my case it saved the build yml file in the master branch.
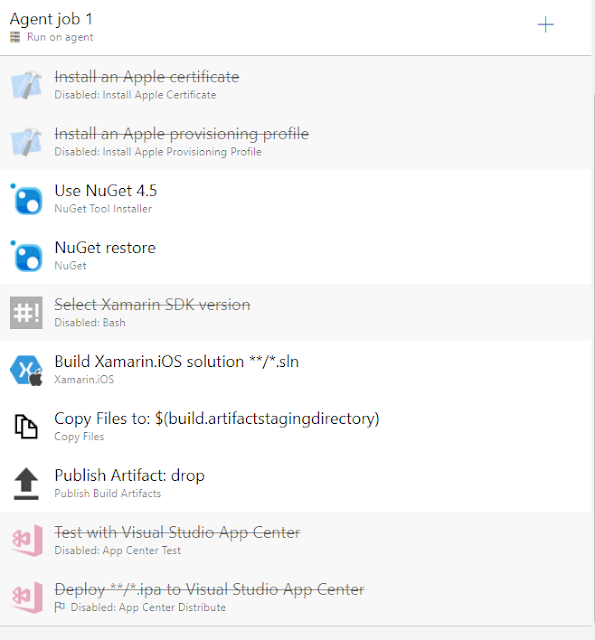
Now I need to create another pipeline for iOS and If I follow the same steps it will read the existing yml file which I do not want it to do. So to avoid that you need to select an option highlighted in the below image.

Follow the steps and choose Github as Source. Select your repo and branch for the pipeline. Once you do that It will show you the list of templates you can use. I am choosing Xamatin.iOS as that is the one I need.
Azure will disable the steps which we would need later to release the app.
I will revisit these pipelines in the upcoming articles. As I need to learn how to publish the app to Google Play Store and Apple Store once it is matured enough :P.
Let me show you what I did on the 3rd day.
If you read the previous post. I did make it work on the simulator using the Plugin.Permissions. However, when I ran the application in the simulator it did work but I did not see any messages requesting for access permissions.
So, I am going to try to run the app on the device and see what happens.
The device I am going to use is Moto X running Android version 6.0.1. I am not gonna bore you with how to setup the device as you may not be going to use the same device. Just the basic stuff you need
- USB drivers for the device
- A USB cable with data pins. Normal charging cables won't work.
- Put the device in the debug mode.
Alright, I have the device up and running. Once you finish setup your device you will see it in visual studio. Make sure you have *.Android as a start-up project.

Weird! I did not see the permission request message on the device as well. Let's see what is happening.
Cool! Android has divided the permissions into 2 groups normal and dangerous. Normal permission will be granted automatically during the installation of the app. I would suggest reading through Android Permissions doc. Phew! finally, know why it is not asking for permissions.
Now that I know how permissions are granted, let's see what happens if I deny those permissions in the settings for my app.
The application is not starting. hmmmm.. let's see what is happening. So I figured that my app needs to implement the code as suggested in the post of Android permissions.
I will remove the plugin.permission that I installed yesterday and do it the way it is suggested in the post. Later will try to understand the benefits of that plugin and why I need it.
So I followed the post and it worked fine. but I went to the apps settings and denied the permission for the app for location. When I am launching my app again it is not requesting for the permission as it should be. So now I will have to dig deep into this.
I could not figure out why it is saying that permission is granted when clearly I had denied the location permission in apps settings.
Let me go back to the Plugin.Permissions and see what happens. Using the plugin it works fine and will show the dialog for location access request as shown in the image below.
I am not sure why it is not working with Xamarin support compact APIs. Sometimes you need to let it go... but I will come back to this.
Ok, so now that we have something that is ready to be consumed by our next step. If you read the First-day article Step 2 is to get the selected location on the map.
Before doing that I would like to setup a CI/CD for this app. Because that is what I would like my readers to follow. Have something small working condition and then before going deep into what you are doing setup a CI/CD.
I am planning to use Azure DevOps to use build the code whenever we merge the code to master. It is super easy to setup and I will add the steps here.
You log in to your Azure DevOps and create a new project. Once the project is created click on Pipelines on the left sidebar menu
- Where is your code?


Once you finish authorization it will display the list of repository for you and choose the repo you want to setup CI for.
After that, it will try to find a recommended template for a build for you. It will show .Net Desktop but if you scroll down you will see Xamarin. Android and other options. You need to add build pipeline for each environment you want to build for.
I used the Xamarin.Android and created a build pipeline for that. It will save a yml file for this build in the branch you had selected, in my case it saved the build yml file in the master branch.
Now I need to create another pipeline for iOS and If I follow the same steps it will read the existing yml file which I do not want it to do. So to avoid that you need to select an option highlighted in the below image.

Follow the steps and choose Github as Source. Select your repo and branch for the pipeline. Once you do that It will show you the list of templates you can use. I am choosing Xamatin.iOS as that is the one I need.
Azure will disable the steps which we would need later to release the app.

I will revisit these pipelines in the upcoming articles. As I need to learn how to publish the app to Google Play Store and Apple Store once it is matured enough :P.
Let me show you what I did on the 3rd day.
No comments:
Post a Comment