Saturday, March 26, 2022

Insert Jump break in Google blogger new interface

 Google has recently updated the blogger interface and has introduced so many great features. One of the features of the blogger is that you can put a jump break in the article and if you are showing multiple blogs on the landing page, then that break will put a jump and a Read more link. 

With new changes, the option has moved. To insert jump break in the page you have to be in the Compose View and in the toolbar click ... and then choose Insert Jump break as shown in the image below.


insert jump break


Thursday, March 24, 2022

Every iOS developer should know these Xcode tricks

 As iOS Developer you must be spending 8-9 hours of the day using Xcode. It is really important that you know the IDE to get most out of it and get more efficient with coding.

Refresh Canvas and close/open canvas


While using SwiftUI one of things you interact most is SwiftUI previewer and we see the Resume button on the previewer and have to click it to so many times. 


Well there is a keyboard shortcut that can make your life easier. By default it is set to Option + Command + P but you can reconfigure it your liking. e.g. I have set it to Command + P


and to do this I had to remove the shortcut for Print. Let's be very clear we do not do Print command from Xcode every day :), So I choose the nearest key to the default one.

Another good shortcut to know if Opening and closing the Canvas, May be there are times where you want to just focus on code and get some more real estate to work with and just want to close the canvas and then once done you want to reopen it again. You can use Option + Command + return to toggle the canvas visibility. Again you can use Xcode keybinding to reconfigure it to your liking.

Open Quickly

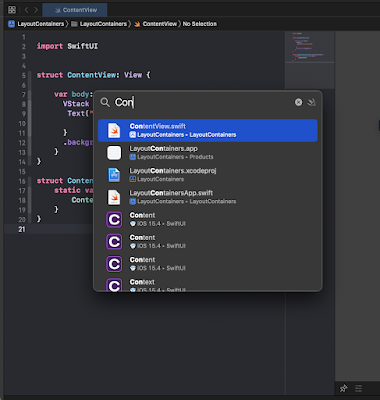
If you are working on large project and working on few files then you must know this feature of Xcode. Open quickly let's you open files with you know the name of the file. Press Command + Shift + O to open it and then just start trying the name and you will see the list


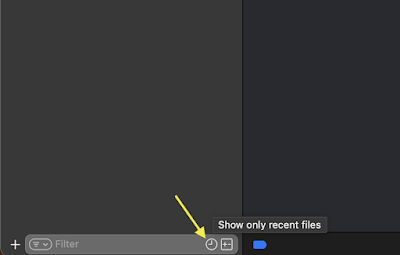
A companion option to this one is show only recent files toggle in the project navigator. When enabled it will only show the files you have recently interact with. 


Rename refactoring

Tuesday, March 22, 2022

How to enable spell checking in XCode

 Do you get a lot of PR comments for spelling mistakes? Then this will help you a lot to fix those issue while you are typing.

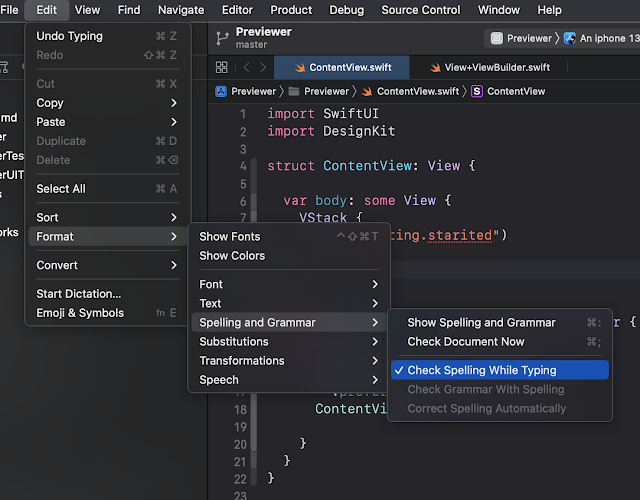
You can navigated to Edit -> Format -> Spelling and Grammar  and then select ✔Check Spelling While Typing option so that you get live spell checking.


As you can see in screenshot my misspelled word is highlighted with dotted red underline. 

Enjoy Coding!!

Guide to SwiftUI layout and presentation controls in iOS

SwiftUI Layout Containers


It is always better to know about all the tools before you start your DIY project. You need to know what tools are available and what each tool can be used for. The same strategy can be applied to UI design. If you know all the available tools provided by the SwiftUI framework then you will be able to apply that knowledge to the beautiful designs that your designer has provided you with. Following are the Layout containers provided by SwiftUI.

HStack

you can refer HStack as a horizontal stack. You want to stack your controls shown in the image below. 

Horizontal plates stacking


The views in SwiftUI are aligned in a similar fashion as shown in image below

SwiftUI HStack


LazyHStack

As the name says this is a Lazy container. As the keyword, Lazy in a programming language is a strategy to delay the initialization until it is needed. The views in the LazyStack are not initialized until they are needed. 

You can try this code and see how it works. 

import SwiftUI


struct CustomText: View {

  private let index: Int

  init(index: Int) {

    print("init CustomText \(index)")

    self.index = index

  }

  var body: some View {

    Text("This is custom text view")

  }

}


struct ContentView: View {

    var body: some View {

      ScrollView(.horizontal) {

        LazyHStack {

          ForEach(0...100, id:\.self) { index in

            CustomText(index: index)

          }

        }

      }

    }

}

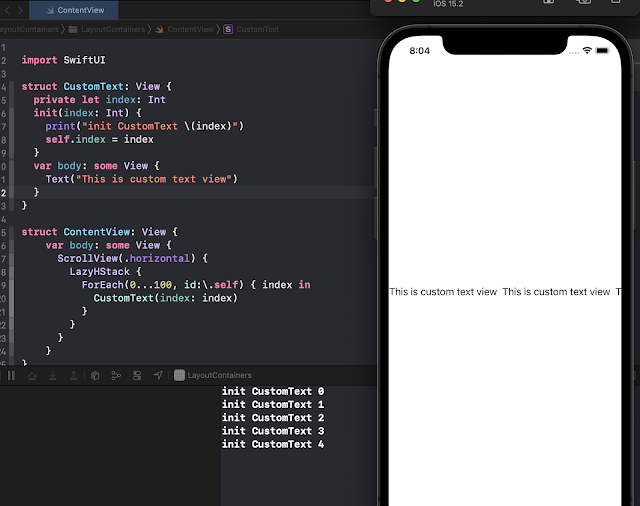
It should look like as shown in image below when you first run it. 

LazyHStack Image


VStack

The Stack is referred to as vertical stack e.g. as shown in the image below


Vertical Stack plates


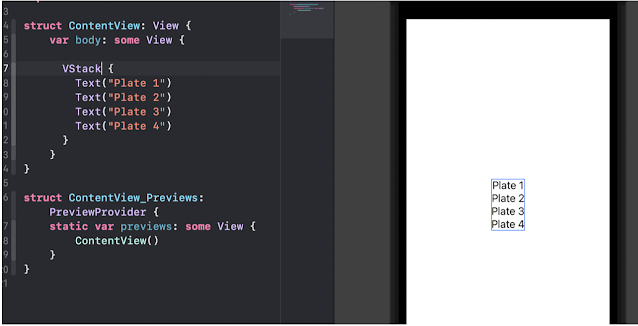
The corresponding SwiftUI views are stacked in a similar fashion as shown in the image below.

SwiftUI VStack


LazyVStack

LazyVStack works very similar to LazyHStack, it's just that it will align the items vertically. Before you read further, I want you to try the code from the LazyHStack section and just change the LazyHStack to LazyVStack. 

Check the output in the debug window. Must be wondering what is going on there. All the items are getting rendered. 

So what should you do it fix it? Try it before looking at the code below. 

|

|

|

I am sure you have tried it. The thing is that you need to change the ScrollView to be .vertical.

import SwiftUI


struct CustomText: View {

  private let index: Int

  init(index: Int) {

    print("init CustomText \(index)")

    self.index = index

  }

  var body: some View {

    Text("This is custom text view")

  }

}


struct ContentView: View {

    var body: some View {

      ScrollView(.vertical) {

        LazyVStack(alignment: .center, spacing: 50) {

          ForEach(0...100, id:\.self) { index in

            CustomText(index: index)

          }

        }

      }

    }

}

Thursday, October 8, 2020

Ionic Capacitor CI/CD using new yaml pipeline with multiple stages

The Ionic Capacitor is a new framework to build cross-platform apps. In this article, we will learn how to set up an Azure DevOps pipeline to build and deploy to AppCenter to distribute to test users.

For simplicity, I am going to build only the android project in this article. You can always add more jobs to run in parallel to build the other environments. Also, I am assuming that you have some experience build Azure pipelines and know about defining variables in the pipeline and how to store secrets in Secure Files and Variables. Please let me know in the comments if there anything specific about the pipeline you don't understand,

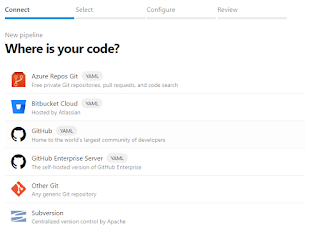
I started with creating an empty yaml pipeline and here you have different options to choose your repo from. I have my repo on Azure reports Git and will select that and choose my repo from the next screen. 


New pipeline

Once you select your repo you will get some recommendations in the Configure 
Configure your pipeline


I picked up the starter pipeline to get the basic pipeline in place, which will checkout the branch based on the trigger branch, which by default will be master.

Once you select the Starter pipeline you will get something like this.


# Starter pipeline
# Start with a minimal pipeline that you can customize to build and deploy your code.
# Add steps that build, run tests, deploy, and more:
# https://aka.ms/yaml

trigger:
master

pool:
  vmImage'ubuntu-latest'

steps:
scriptecho Hello, world!
  displayName'Run a one-line script'

script: |
    echo Add other tasks to build, test, and deploy your project.
    echo See https://aka.ms/yaml
  displayName'Run a multi-line script'

we will start to make changes to the pipeline.